- Department of Neurosurgery, Universidade Federal de São Paulo, São Paulo, Brazil.
Correspondence Address:
Feres Chaddad-Neto, Department of Neurosurgery, Universidade Federal de São Paulo, São Paulo, Brazil.
DOI:10.25259/SNI_978_2021
Copyright: © 2021 Surgical Neurology International This is an open-access article distributed under the terms of the Creative Commons Attribution-Non Commercial-Share Alike 4.0 License, which allows others to remix, tweak, and build upon the work non-commercially, as long as the author is credited and the new creations are licensed under the identical terms.How to cite this article: Marcelo Augusto Acosta Goiri, Bruno Loof de Amorim, Talita Helena Martins Sarti, Marcos Devanir Silva da Costa, Feres Chaddad-Neto. Building a microneurosurgical laboratory in Latin America: challenges and possibilities. 23-Nov-2021;12:573
How to cite this URL: Marcelo Augusto Acosta Goiri, Bruno Loof de Amorim, Talita Helena Martins Sarti, Marcos Devanir Silva da Costa, Feres Chaddad-Neto. Building a microneurosurgical laboratory in Latin America: challenges and possibilities. 23-Nov-2021;12:573. Available from: https://surgicalneurologyint.com/?post_type=surgicalint_articles&p=11242
Date of Submission
27-Sep-2021
Date of Acceptance
21-Oct-2021
Date of Web Publication
23-Nov-2021
Abstract
Background: Training in microsurgical neuroanatomy is a priority for neurosurgical education. During the 20th century, microsurgical laboratories arose and provided a way to develop surgical skills. Few reports addressed the assembly, construction, and details of a training laboratory.
Methods: We have conducted a literature review and searched legislation on the need to plan the structure of the laboratory.
Results: We projected and built a laboratory through a public-private partnership. High-tech workstations and instruments were planned to meet the needs of residents, fellows, and student. All steps and materials were in accordance with the Brazilian legislation and articles previously selected.
Conclusion: We described our experience and demonstrated the implementation of a micro neurosurgical skills laboratory.
Keywords: Laboratory training, Microsurgical techniques, Neuroanatomy, Neurosurgical education
INTRODUCTION
The study of anatomy has always been in the foundation classes of modern medical schools,[
During the second half of the 20th century, micro neurosurgical laboratories arose, and the laboratory of the University of Florida, headed by the iconic Professor Albert Rhoton, was the most highlighted in terms of medical publications.[
Funding, planning, and expertise are the main challenges in the construction of a laboratory, however, few studies have addressed the assembly, construction, and details of a training laboratory. Thus, we will describe our experience building a micro neurosurgical skills laboratory in Latin America.
MATERIALS AND METHODS
We have conducted a literature review of the MEDLINE and SCIELO databases with the keywords “surgical training,” “surgical simulator,” “microneurosurgical anatomy,” “neurosurgical training,” “surgical technique laboratory,” and “neurosurgical laboratory.” The articles of these categories were chosen based on the need to plan the structure of the laboratory.
The legislation to obtain the specimens was searched on Brazil government websites with the keywords “use of cadaver for training,” “cadaver for learning,” “technical standards for laboratories of training,” and “legislation about surgical training.”
After the literature review, we described our experience and lessons learned building a microsurgical skills laboratory at our institution.
RESULTS
Laboratory training
The microsurgical technique became the cornerstone of modern neurosurgery. Kshettry et al. studied the prevalence of these training laboratories and found that more than 90% of the residence programs teach anatomical dissections.[
In the economic findings, there are important features that are not recognized and studied for a cost-benefit analysis. Scott et al. compared the training costs for residents of general surgery and found that surgical simulators decreased costs and improved surgical skills, which brought the need to use these educational tools while teaching.[
Every construction in public spaces, such as the Federal University of São Paulo, has specific standards for inspection and execution and is standardized by public regulation organs in the following steps: (1) a preliminary phase before bidding; (2) an internal phase of bidding; (3) an external phase of bidding; (4) a contractual phase; and (5) a posterior phase after contract.[
Recently, with the new Federal Brazilian law of 2017, public-private partnerships have become flexible and favor public universities.[
Workstations and instruments
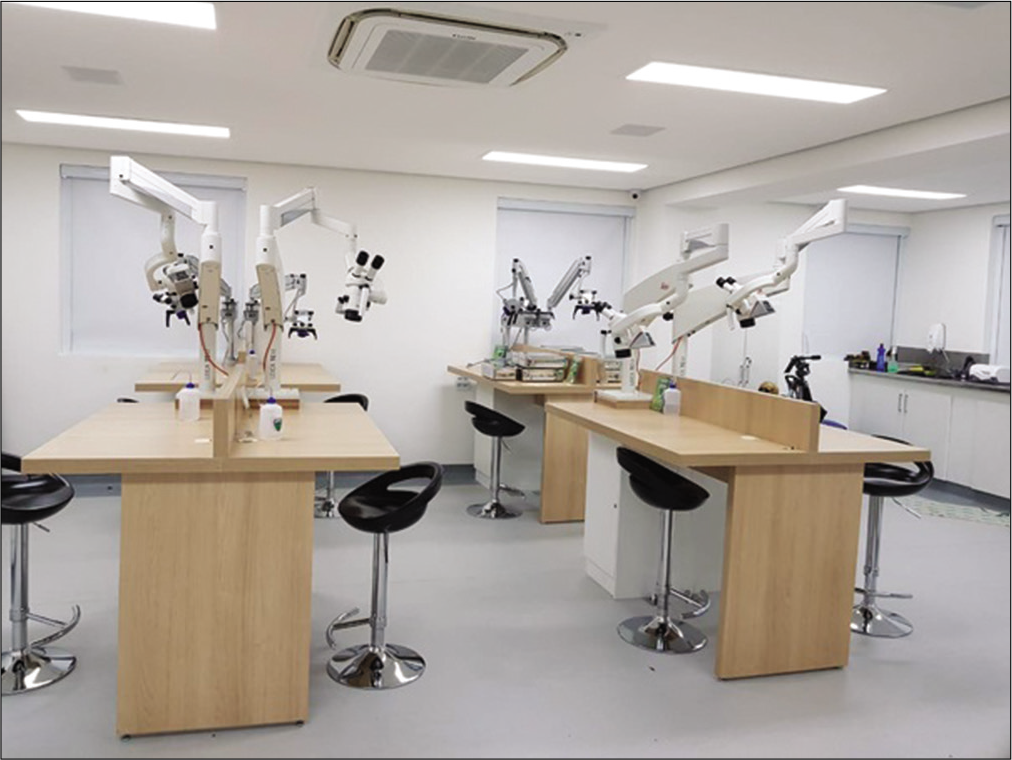
Based on the requirements previously cited, such as those of structure and law, the laboratory was projected and the layout of the building was constructed. The space was designed with two main entrances, independently, and one access was constructed between the two parts of the laboratory. The instructor’s workstation was in the central part of the laboratory and students could follow the transmission screens. The project had 20 workstations [
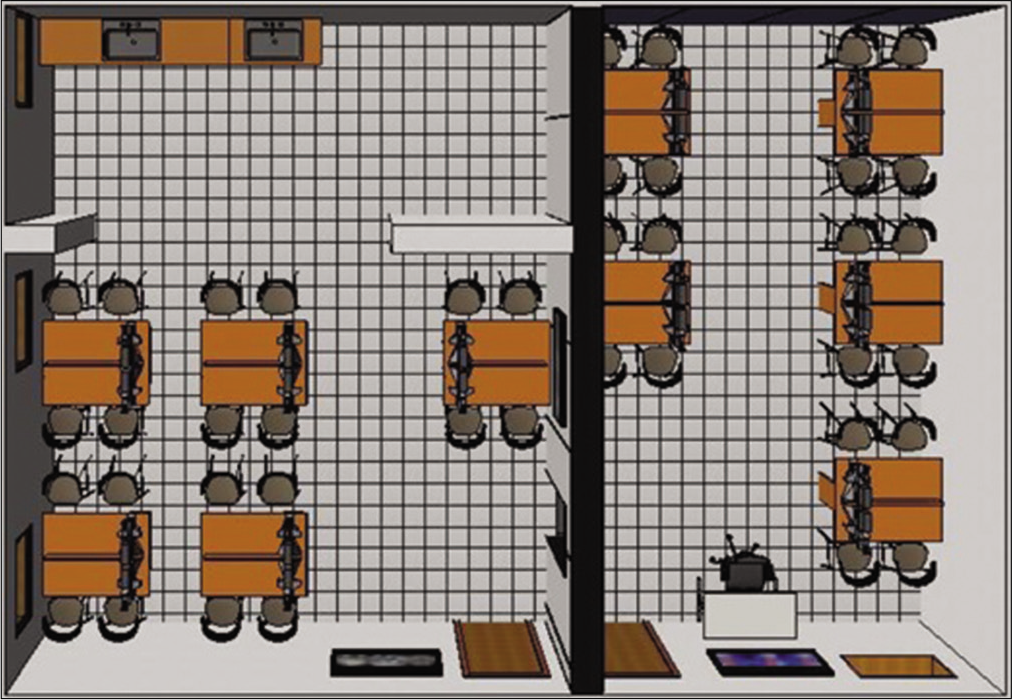
In terms of permanent laboratory items, we projected the workstations with materials authorized by the National Health Surveillance Regulatory Agency to allow adequate cleaning.[
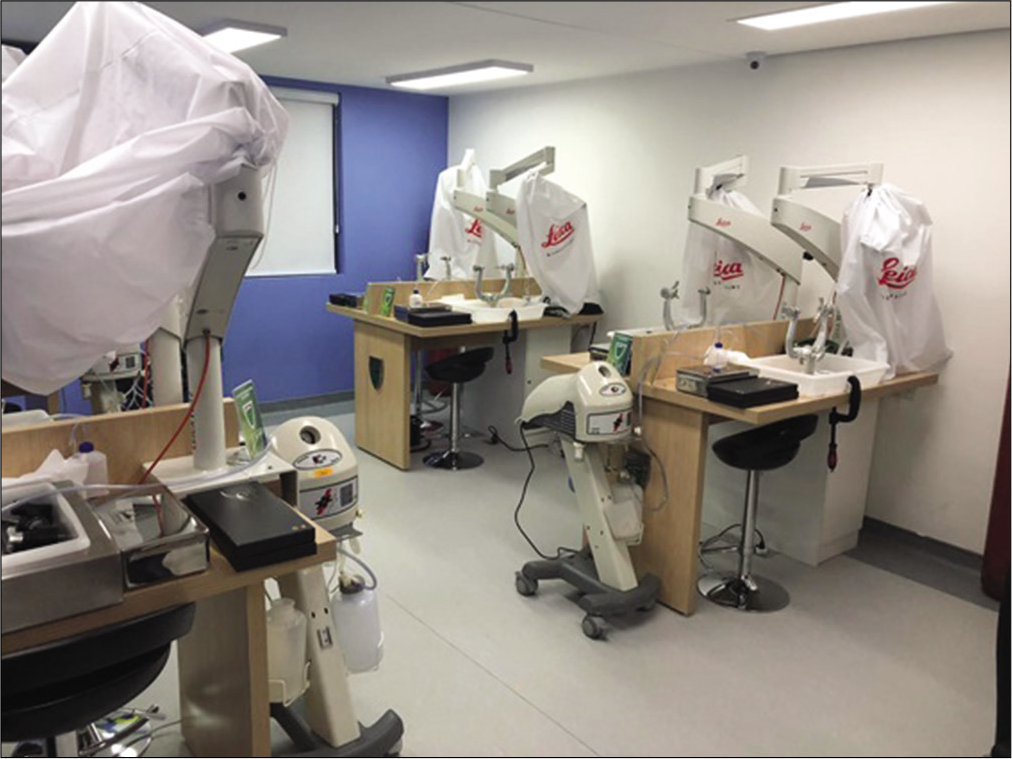
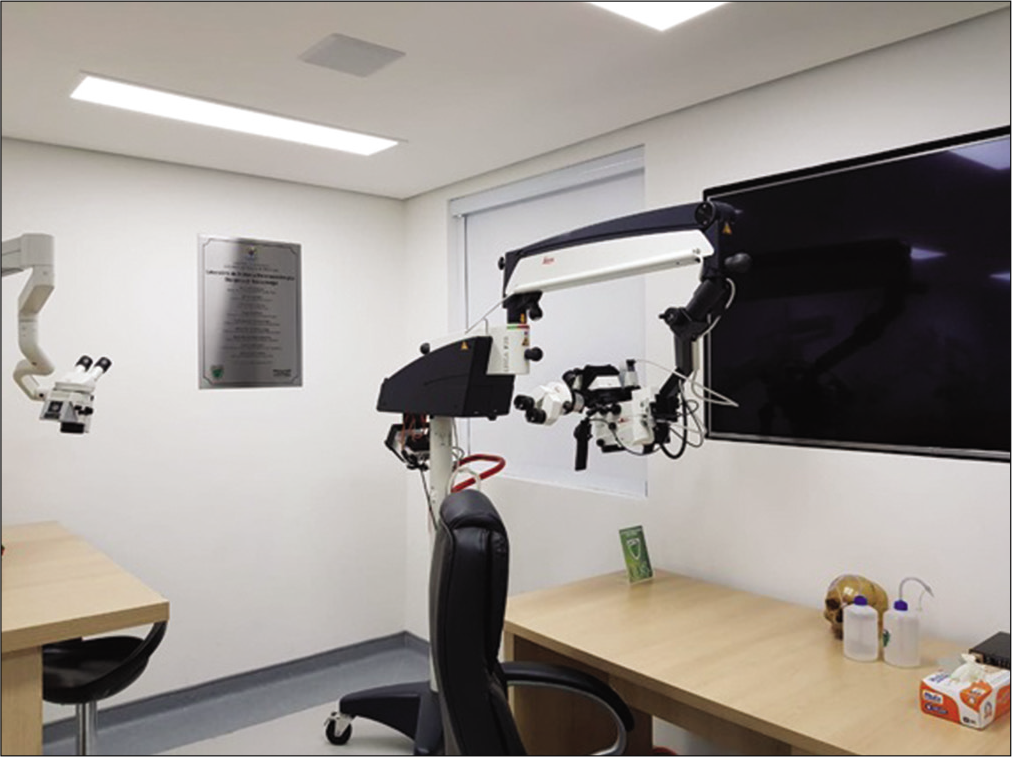
Each workstation has a bifocal microscope with fixed or adjustable distance, articulated and fixed on the stand with its lighting system. The most advanced models included light-emitting diode (LED) lighting systems. The LED lamp has good sharpness and color reproduction, focusing on white.[
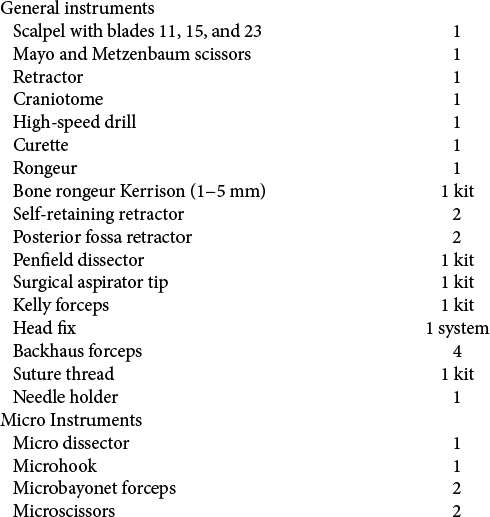
The instruments in the project were intended to provide the basic instruments necessary for the use of cranial approaches and micro-instruments for the use of microsurgical tasks. The instruments planned to meet our needs were adapted from the work of Salma et al.[
Documentation
Careful documentation of dissections performed in the laboratory is crucial. One way to do this is by taking a three-dimensional photograph. For this purpose, a digital single-lens reflex (DSLR) camera (Nikon D5600), a tripod, a twoway rail slider (FOTOMATE® LP-01), and a regular ring flash were used. The sample is placed on a black background and light contamination is avoided. This can avoid turning the laboratory lights off or the isolation of the specimen in a box with a black background.
The camera (with the ring flash and the rail slider) over the tripod, is placed in front of the specimen, at a proper distance, depending on the purpose of photography. Two photographs are taken, one from the left and one from the right, always focusing on the same spot. The side-to-side distance is calculated after measuring the distance in centimeters from the camera to the specimen and then dividing it by 30. The pair of photographs are uploaded to a website (
Specimens
According to the Brazilian law, for a corpse to be forwarded to an educational institution, it should be established that: it has not been claimed within 30 days or it is not identified. Even after identification, it has to be secured that is not possible to obtain information related to the addresses of relatives or legal guardians after publication in the main newspapers of the city, as a public benefit, at least 10 days after the news of the death.[
As in the Brazilian federal law, no articles have addressed the separation of corpses into parts for specific training, such as in neurosurgery. It is used as a legal prerogative of the State of São Paulo that establishes in one of the articles the prohibition on the forwarding of cadaver parts to other educational or research institutions, so that, in case they are identified, they do not cause inconvenience to the corpse’s family.[
Preparation of the specimens is another key point in providing a great anatomical dissection. Many substances can be used, with formaldehyde, alcohol, and glycerin being common, with their advantages and limitations.[
The technique for silicone injection is cannulation of the vessels in the neck, previously washed with saline to remove clots. Subsequently, the vessels are injected with colored silicone with adequate pressure to mark the vasculature, making multimedia records interesting and dissection a good learning experience. Some mixtures have been explored by the authors to inject into the vessel. We used an adaptation of the study of Rhoton, using a thinner-to-silicon ratio of 2:1 for arteries and 1:1 for veins.
DISCUSSION
The laboratory was built through a public-private partnership to provide materials.[
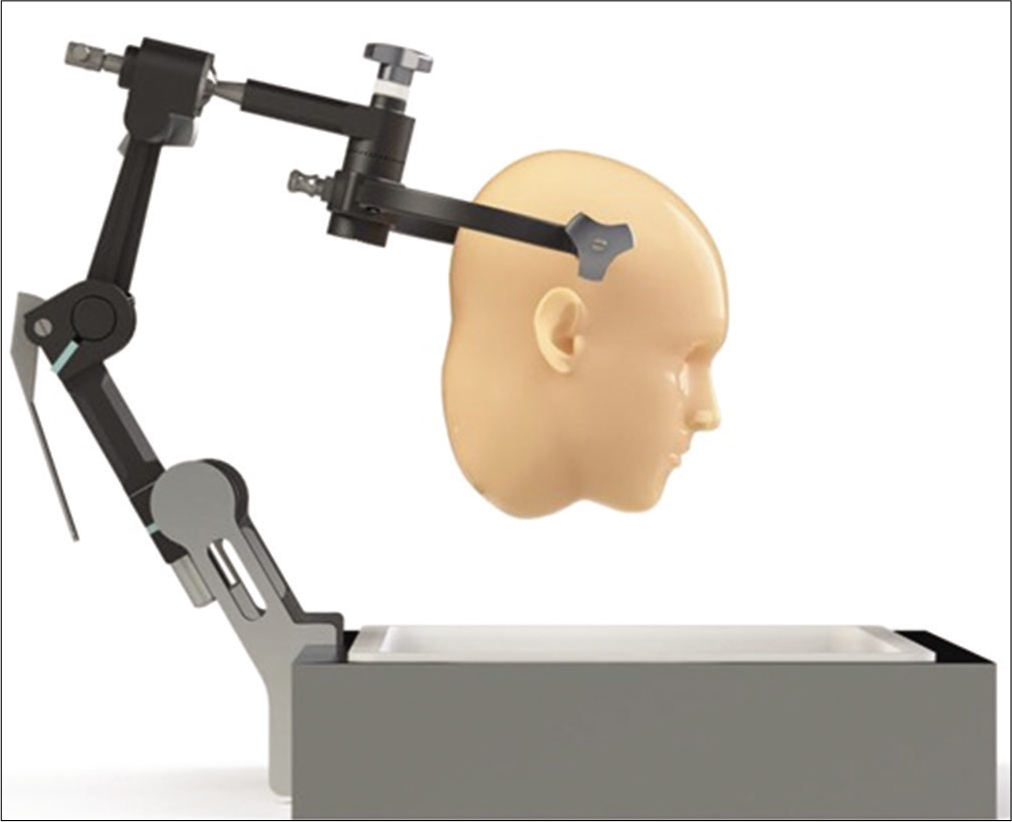
The Laboratory for the Development of Microneurosurgical Techniques was inaugurated on December 3, 2018, under the name of the Laboratory of Microneurosurgical Anatomy. This laboratory was installed applying all the factors described in this study. Currently, the laboratory has 20 stations, each one consisting of a stand [
CONCLUSION
The process of building and implementing the laboratory of micro neurosurgical techniques is essential for any neurosurgery training service to help other services globally with this difficult task for the development of microsurgical techniques.
Other neurosurgical services can study this model as an example and adapt it to their requirements, especially in countries with many bureaucratic barriers and find a way to complete this fundamental tool to improve neurosurgical techniques. Public-private partnerships are another way to obtain inputs for carrying out this project. Despite the limitations related to planning, fundraising, and implementation of this type of a project, we demonstrate the feasibility of building a world-class laboratory with all the standards and high-tech equipment.
Declaration of patient consent
Patient’s consent not required as there are no patients in this study.
Financial support and sponsorship
Nil.
Conflicts of interest
There are no conflicts of interest.
References
1. da Silva GR, Cortez PO, de Sousa Leal Lopes I, Teixeira BD, de Sousa Leal NM. Methods of conservation of human cadavers used in medical schools in Brazil. Rev Med. 2016. 95: 156
2. da Silva RK, Brito VC, de Oliveira BD, Costa ÉM, de Moura GJ. Advantages and disadvantages of teaching materials preparation techniques for morphology practices. Rev Didática Sistêmica. 2011. 13: 24-41
3. Federal S. Lei No.11079. Available from: http://www.planalto.gov.br/ccivil_03/_ato2004-2006/2004/lei/l11079compilado.htm [Last accessed on 2019 May 25].
4. Federal S. Lei No.8.501. 1992. p.
5. Goel A, Muzumdar DP, Phalke U. Head holder for microsurgical dissection. J Clin Neurosci. 2004. 11: 300-1
6. Hagen SS, Ferguson KJ, Sharp WJ, Adam LA. Residents’ attitudes about the introduction of a surgical skills simulation laboratory. Simul Healthc. 2010. 5: 28-32
7. Hospitalar CC.editors. Processamento de Artigos e Superfícies em Estabelecimentos de Saúde. Brasília: Ministério da Saúde; 1994. p.
8. Kriss TC, Kriss VM. History of the operating microscope: From magnifying glass to microneurosurgery. Neurosurgery. 1998. 42: 899-907
9. Kshettry VR, Mullin JP, Schlenk R, Recinos PF, Benzel EC. The role of laboratory dissection training in neurosurgical residency: Results of a national survey. World Neurosurg. 2014. 82: 554-9
10. Matsushima T, Lister JR, Matsushima K, de Oliveira E, Timurkaynak E, Peace DA. The history of Rhoton’s lab. Neurosurg Rev. 2019. 42: 73-83
11. .editors. Ministério Público de São Paulo Provimento. 1997. 16/97: 1
12. Oliveira CH, Costa MA, Costa GH.editors. Estudo comparativo entre fontes de iluminação com lâmpadas halógenas e com LED no diagnóstico da microscopia clínica. Anais XXIV Congresso Brasileiro de Engenharia Biomédica. Uberlândia, MG: 2014. p.
13. Salma A, Chow A, Ammirati M. Setting up a microneurosurgical skull base lab: Technical and operational considerations. Neurosurg Rev. 2011. 34: 317-26
14. Scott DJ, Bergen PC, Rege RV, Laycock R, Tesfay ST, Valentine RJ. Laparoscopic training on bench models: Better and more cost effective than operating room experience?. J Am Coll Surg. 2000. 191: 272-83
15. Singer C. How medicine became anatomical. Br Med J. 1954. 2: 1499-503
16. União TC, de Contas da União T.editors. Fluxograma de procedimentos. Obras Públicas: RecomendaçÕes Básicas Para a Contratação e Fiscalização de Obras de EdificaçÕes Públicas. Brasília: Tribunal de Contas da União; 2014. p. 104
17. Zammar SG, Hamade YJ, Aoun RJ, El Tecle NE, El Ahmadieh TY, Adelson PD. The cognitive and technical skills impact of the Congress of Neurological Surgeons simulation curriculum on neurosurgical trainees at the 2013 neurological society of India meeting. World Neurosurg. 2015. 83: 419-23